Website Documentation: How-to
General
Adding Live Demo / Pod 101 Events
Blog: Adding images within body copy using HTML
Blog: Using layout builder
Creating a "Draft" of a Published Page
Getting Started Guide for Authors
Replacing PDF Files (Overwriting)
Setting up Salesforce Campaigns to be added to ctoken mapping for US PIF
Translations and Localization
Creating Anchor Links
IMPORTANT NOTE:
Most of this is possible to do with standard editor access to the website. However, if you're doing text-to-text anchor linking, you'll need full editor's access (for full HTML capability). If you do not have that access, please ask Marc or Andrew.
From Hero Image CTA to Section:
- Click "Edit"
- Click "PAGE STYLE AND CONTENT SETTINGS"
- Under "CALL TO ACTION", in the "URL" field, input something such as: "#coverage-form"
- Click the blue "Save" button at the bottom of the page
- Click "Layout" to go back to the Layout Builder
- Click "Configure Section [#]" of whichever section you want to link to
- Under "Id attribute", add the text from Step 3 without the "#", such as: "coverage-form"
- Click the blue "Update" button at the bottom of Configure section
From Body Text to Section:
- Click the pencil icon next to the text block you want to edit
- Click Configure from drop-down menu.
- Click Source.
- Within the source code of text, add: <a href="#"></a>
Example: <a href="#guidelines">Guidelines</a> - Click the Source button again
- Click the purple Update button at the bottom of the pop up window
- Click "Configure Section [#]" of whichever section you want to link to
- Under "Id attribute", add the text from step 4 without the "#"
Example: "guidelines" - Click the blue "Update" button at the bottom of Configure section window.
From Text to Text:
- For your "from" text, within Source code and next to your <p> tag, add "<a href="#___"></a>
Example: <p><a href="#dash">DASH Terms and Conditions</a></p> - For your "to" text, change "Text format" setting to "Full HTML", go to source code, and add an ID to your <p> tag.
Example: <p id="dash">Dash Terms and Conditions Content</p>
From CTA to Text:
- Go Configure the CTA button.
- For the URL of the CTA button, add something like, "#benefits".
- Go to the text you want this to jump to and change the text format to Full HTML or HTML.
- Add the ID used earlier to the text you want this to jump to. Example: "<p id="benefits">Check My Benefits</p>". This must be done in the Source code.
Add a Playlist of Training Videos
1. Add a "Training Videos Playlist"
2. Edit Training Videos in Playlist
The Training Videos Playlist allows you to add new and existing training videos to the playlist. There is no need to create training videos using the Training Video content type directly. Click "Add A New New Node" to add a training video. Click "Add Existing Node" to add a node that was previously created. The same training videos can be used in multiple playlists.
3. Sort Training Videos
You can drag and drop videos in the list by clicking and dragging the directional icon to re-order their position in the playlist.
4. Place Training Video Playlist Block
To place the block on a page using Layout Builder, you need to know the ID of the playlist block. You can find the id listed to the right of the playlist title in the content list table.
Using Layout Builder, add a "Training Video Playlists" views block. When configuring your block, in the nid field insert the id of the Training Video Playlist.
CKEditor - Insert Media - Image/PDF
Note: This function only allows you to insert image and PDF files.
How to:
- Add a Text/CTA block to a section.
- Click "Insert Media" icon on the CKEditor toolbar (icon with the music note symbol).
- Type in file name in search box (then click "Apply Filters") or click on the chosen file within search results window (if the file of interest is already displaying).
- Click on "Insert selected" button at the bottom-middle
- The file will appear within the CKEditor and you will have the ability to make it align left, right, and more, if so desired.
- Click on purple "Update" button (if modifying an existing block) or "Add" if adding a new block.
Keyword Filter in Media Library
How to add keywords for an existing file:
- Hover over "Content" tab in the toolbar (located towards the top left).
- Hover over "Media" in the sub-menu (located towards the bottom of the drop-down).
- Click on "Media Library" in the expanded menu to the right.
- Find the file you're looking for and click on the pencil icon (located top-right corner of file).
- Under the section titled, "Media Keywords", add your keyword. Note: you can only add one keyword per entry.
- If you're adding more than one, proceed to add another by clicking on "Add another item" CTA underneath the Media Keywords field.
- When you're done with adding your keyword(s), scroll down and click on the blue "Save" button.
Best practice tip: It is best to use a keyword that makes sense for the type/category of file you're uploading. Here are some examples:
- Good: "Icon", "Podder", or "Guide"
- Bad: "Bicycle" or "Orange Pod"
How to add keywords while uploading a new file:
- Hover over "Content" tab in the toolbar (located towards the top left).
- Hover over "Media" in the sub-menu (located towards the bottom of the drop-down).
- Hover over "Add media" in the expanded menu to the right.and then click on which type of file you'd like to upload.
- Before you've hit Save, you will add your keyword under the "Media Keywords" section. Note: you can only add one keyword per entry.
- If you're adding more than one, proceed to add another by clicking on "Add another item" CTA underneath the Media Keywords field.
- When you're done with adding your keyword(s), scroll down and click on the blue "Save" button.
Best practice tip: It is best to use a keyword that makes sense for the type/category of file you're uploading. Here are some examples:
- Good: "Icon", "Podder", or "Guide"
- Bad: "Bicycle" or "Orange Pod"
Ability to Rename File
The following roles have access to this feature:
- Administrator
- Editor-in-Chief
- Editor
How to rename an uploaded file
When you upload a PDF as a Document (a type of Media), then you are able to rename the file.
- Go to /admin/content/media and use the filters to find the Document whose file you want to rename.
- Click on the link for that Document in the "Media Name" column. You will now be able to edit the Document Media item.
- Click on the Rename link to the right of the file name.
- Give the new name, and click Save.
Example Use Case for renaming a file
You have a file named user-guide.pdf. However, a new version of the guide has just come out, and you want the newer version to have that name.
You can go to the Document which holds user-guide.pdf. Rename the file to something like user-guide-v1.pdf.
You can now upload your new user guide so that it has the name user-guide.pdf.
Be careful not to break links!
Let's say you have just renamed a file.
If you have used the "Insert Media" feature in the CKEditor to provide links to your document, then all your links will continue to point to the same file. The links will continue to go to the file, even though the file has changed names.
If you have hardcoded links to your document using the Link feature in the CKEditor, then those links will continue to go to the old file name. This could result in a broken link, unless another file now has that name.
Removing a PDF from Google Index
By default, PDF files stored in a Document media type are indexed by Google.
To prevent a PDF from being indexed by Google, the name of the PDF file itself should end in 'archived.pdf'. If you rename the file, do not add the ".pdf" in the rename field, as you will end up with a file whose name is something like abc-archived.pdf.pdf instead of abc-archived.pdf.
Note that a file whose name ends in 'archived.pdf' will still be crawled by search engine bots, but the HTTP header used to serve the file will be marked as "no index" so that the search engines know to not index it. (This is preferable to not having the file crawled by bots, as per Google.)
As per Google: "For faster removals, you can use the URL removal tool in Google Webmaster Tools."
Video Playlist
General Process:
Create video nodes > create playlist node with video nodes added to it > place playlist node on a page
Note:
You could also add the videos directly in the playlists instead of adding them first (using 'Add new node' instead of 'Add existing node'), but if there are any videos that will be on more than one playlist then I'd recommend adding those separately beforehand.
Updating Dated File with New Non-Dated File (URL)
The current file is in the old dated folder format.
The current links link to the current file.
You cannot change the folder of the current file.
You can update the file itself.
We want the file and the links to be for our current best practices – the non-dated folder structure.
We don’t want to break current links we don’t know about, such as those in emails or FAQs.
A solution:
- Update the current files with the new version. This retains existing links, preventing emails and other things out of our control from breaking.
- Upload the new versions as a new file. This gets us our best practices folder location
- Update links on the website (US ES and English resources and guides pages)to point to the new file in the new location. (the “step 2” file)
- Send an updated URL to Maria noting that all items linking to these documents must be updated within 90 days to prevent versioning issues.
- Set a calendar invite for 90 days from now to remove the file.
- …90 days later, delete the “step 1” file.
Show and Hide Classes
Environment Specific
For other content, use the following classes:
- hide-in-prod removes the content when in the Production environment
- hide-in-stage removes the content when in the Stage environment
- hide-in-dev removes the content when in the Dev and IDE environments
Use the Menu Attributes section on a menu item to set this class for a menu item (see attachment). Use the Block CSS Classes field on a block configuration page to set this class for a block (see attachment). Use HTML to apply this inside a CKEditor. In this case, all of the content in that field editable by the CKEditor will show in the Layout Builder. When viewing the node, however, the classes will be applied correctly.
These classes do not apply to the sections in Layout Builder until after saving your layout changes.
If your content uses any other "show" or "hide" classes, those are handled first, then finally these 3 classes are applied, if specified.
Note: environment specific and role-based class hide/show are removed from the DOM.
See Jira ticket CMS-2897 for more detailed info.
Mobile and Desktop
How to show or hide content based on device size
hide-on-mobile:
- Implemented for Layout Builder sections only
- Add this class to the Custom Classes field for a LB section
- When viewing content, this class hides the section content when the browser is 600px wide or smaller
- When editing the layout, the section always appears and has a tannish-color background
hide-on-desktop:
- Implemented for Layout Builder sections only
- Add this class to the Custom Classes field for a LB section
- When viewing content, this class hides the section content when the browser is 601px wide or wider.
- When editing the layout, the section always appears and has a tannish-color background.
Examples of when to use these classes:
- When you have an image or a table or other layout that needs separate mobile and desktop versions for legibility/accessibility/design purposes
- When you need to include device specific information, such as “scroll side to side to see entire table” for html tables on mobile (bad example since it sounds like the plan is to not use html tables if they’re too wide for mobile, so feel free to remove/revise example!)
hide-on-mobile
When viewing content, this class hides the section content when the browser is 600px wide or smaller.
When editing the layout, the section always appears and has a tannish-color background.
hide-on-desktop
When viewing content, this class hides the section content when the browser is 601px wide or wider. When editing the layout, the section always appears and has a tannish-color background.
To Hide From Both Desktop and Mobile (Completely):
- Use "hide-on-mobile hide-on-desktop"
Roles
"show-for-role-technical-editor show-for-role-administrator" is the one Marc and Andrew will use the most.
hide-from-role-xyz
Used to hide content based on the user’s Drupal role.
To hide content based on a role, add a class to that content starting with "hide-from-role-" and ending with the machine name of the role. It should be applied to content which should be hidden ONLY for those roles. The content will be shown for other roles.
For example: "hide-from-role-hcp" will hide the piece of content from all users who have the HCP role.
For roles where the machine name has underscores, use dashes instead. For example, "hide-from-role-validated-hcp".
You can add these classes on Layout Builder sections or on other pieces of content.
show-for-role-xyz
Used to show content based on the user’s Drupal role.
To show content based on a role, add a class to that content starting with "show-for-role-" and ending with the machine name of the role. It should be applied to content which should show ONLY for those roles. The content will be hidden for other roles.
For example: "show-for-role-administrator" and "show-for-role-hcp" on the same piece of content will hide it from everyone who does NOT have the administrator role or the HCP role.
For roles where the machine name has underscores, use dashes instead. For example, "show-for-role-validated-hcp".
You can add these classes on Layout Builder sections or on other pieces of content.
You can combine these classes with the hide-for-role-xyz classes
- The hiding happens first
- Then specific pieces of content are shown for the role(s) as specified by the class(es)
- Example: You might want to plan the content to be hidden from a certain role all the time, and then temporarily hide it from everyone who is not editing that content. You could use `hide-from-role-hcp-failed-validation` and `show-for-role-technical-editor`
How to show or hide content for a specific role
Using a class to hide content from a specific role:
- Layout Builder section
- Add class to "Custom classes" field for section
- e.g. hide-from-role-hcp
- Add class to "Custom classes" field for section
- Other content, such as HTML
- Add class attribute to HTML
- e.g. class="hide-from-role-hcp"
- Add class attribute to HTML
- Class names to use
- `hide-from-role-` plus the role name
- use dashes instead of underscores
- e.g. hide-from-role-validated-hcp
- use dashes instead of underscores
- `hide-from-role-` plus the role name
- Content shows up for other roles that normally can view content
- Content is hidden from DOM for hidden roles
- Example uses:
- hide register now button from HCP's already logged in to Omnipod Connect and validated
- replace register now button with 'pending validation' message for HCP's logged in to Omnipod Connect and pending validation
Using a class to show content for a specific role:
- Layout Builder section
- Add class to "Custom classes" field for section
- e.g. show-for-role-hcp
- Add class to "Custom classes" field for section
- Other content, such as HTML
- Add class attribute to HTML
- e.g. class="show-for-role-hcp"
- Add class attribute to HTML
- Class names to use
- `show-for-role-` plus the role name
- use dashes instead of underscores
- e.g. show-for-role-validated-hcp or show-for-role-technical-editor
- use dashes instead of underscores
- `show-for-role-` plus the role name
- Content is hidden for other roles
- Content is hidden from DOM for other roles
- Example uses:
- for HCP's logged in who have HCP Discover role they can see a section about Omnipod Discover with links to it
You can combine these classes:
- The hiding happens first
- Then specific pieces of content are shown for the role(s) as specified by the class(es)
- Example: You might want to plan the content to be hidden from a certain role all the time, and then temporarily hide it from everyone who is not editing that content. You could use `hide-from-role-hcp-failed-validation` and `show-for-role-technical-editor`
Role Names:
- HCP and related roles: (Maria/Jen could provide more info on these if needed)
- HCP (US HCP's)
- HCP Failed Validation (US HCP sub-role)
- HCP Pending Validation (US HCP sub-role)
- Validated HCP (US HCP sub-role)
- HCP Discover (US HCP sub-role - validated HCP whose workplace is participating in Omnipod Discover)
- HCP France (France HCP's)
- Anonymous user (anyone viewing the website and not logged in)
- Authenticated user (anyone logged in)
- Tester (can view unpublished content)
- Author (can edit/translate content, cannot edit/translate menus, cannot publish pages)
- Editor (can edit/translate/publish content, can edit/translate menus)
- Editor-in-Chief (Marc and Andrew)
- Administrator (Drupal devs)
- More info on roles and who is currently assigned to various roles can be found at https://confluence.insulet.com/pages/viewpage.action?pageId=127739526 – these notes in italics are primarily for the use of Marc and Andrew in determining which roles should be listed in this section in the editors guide.
Examples of when to use these classes:
- Content that should only be visible to validated HCPs and not to HCPs who are not validated yet
- Content that should only be visible to editors and above while it is being built, such as Omnipod 5 content, before it’s ready for go live
Note: environment specific and role-based class hide/show are removed from the DOM.
Section Library
Adding and Using New Sections Templates
x
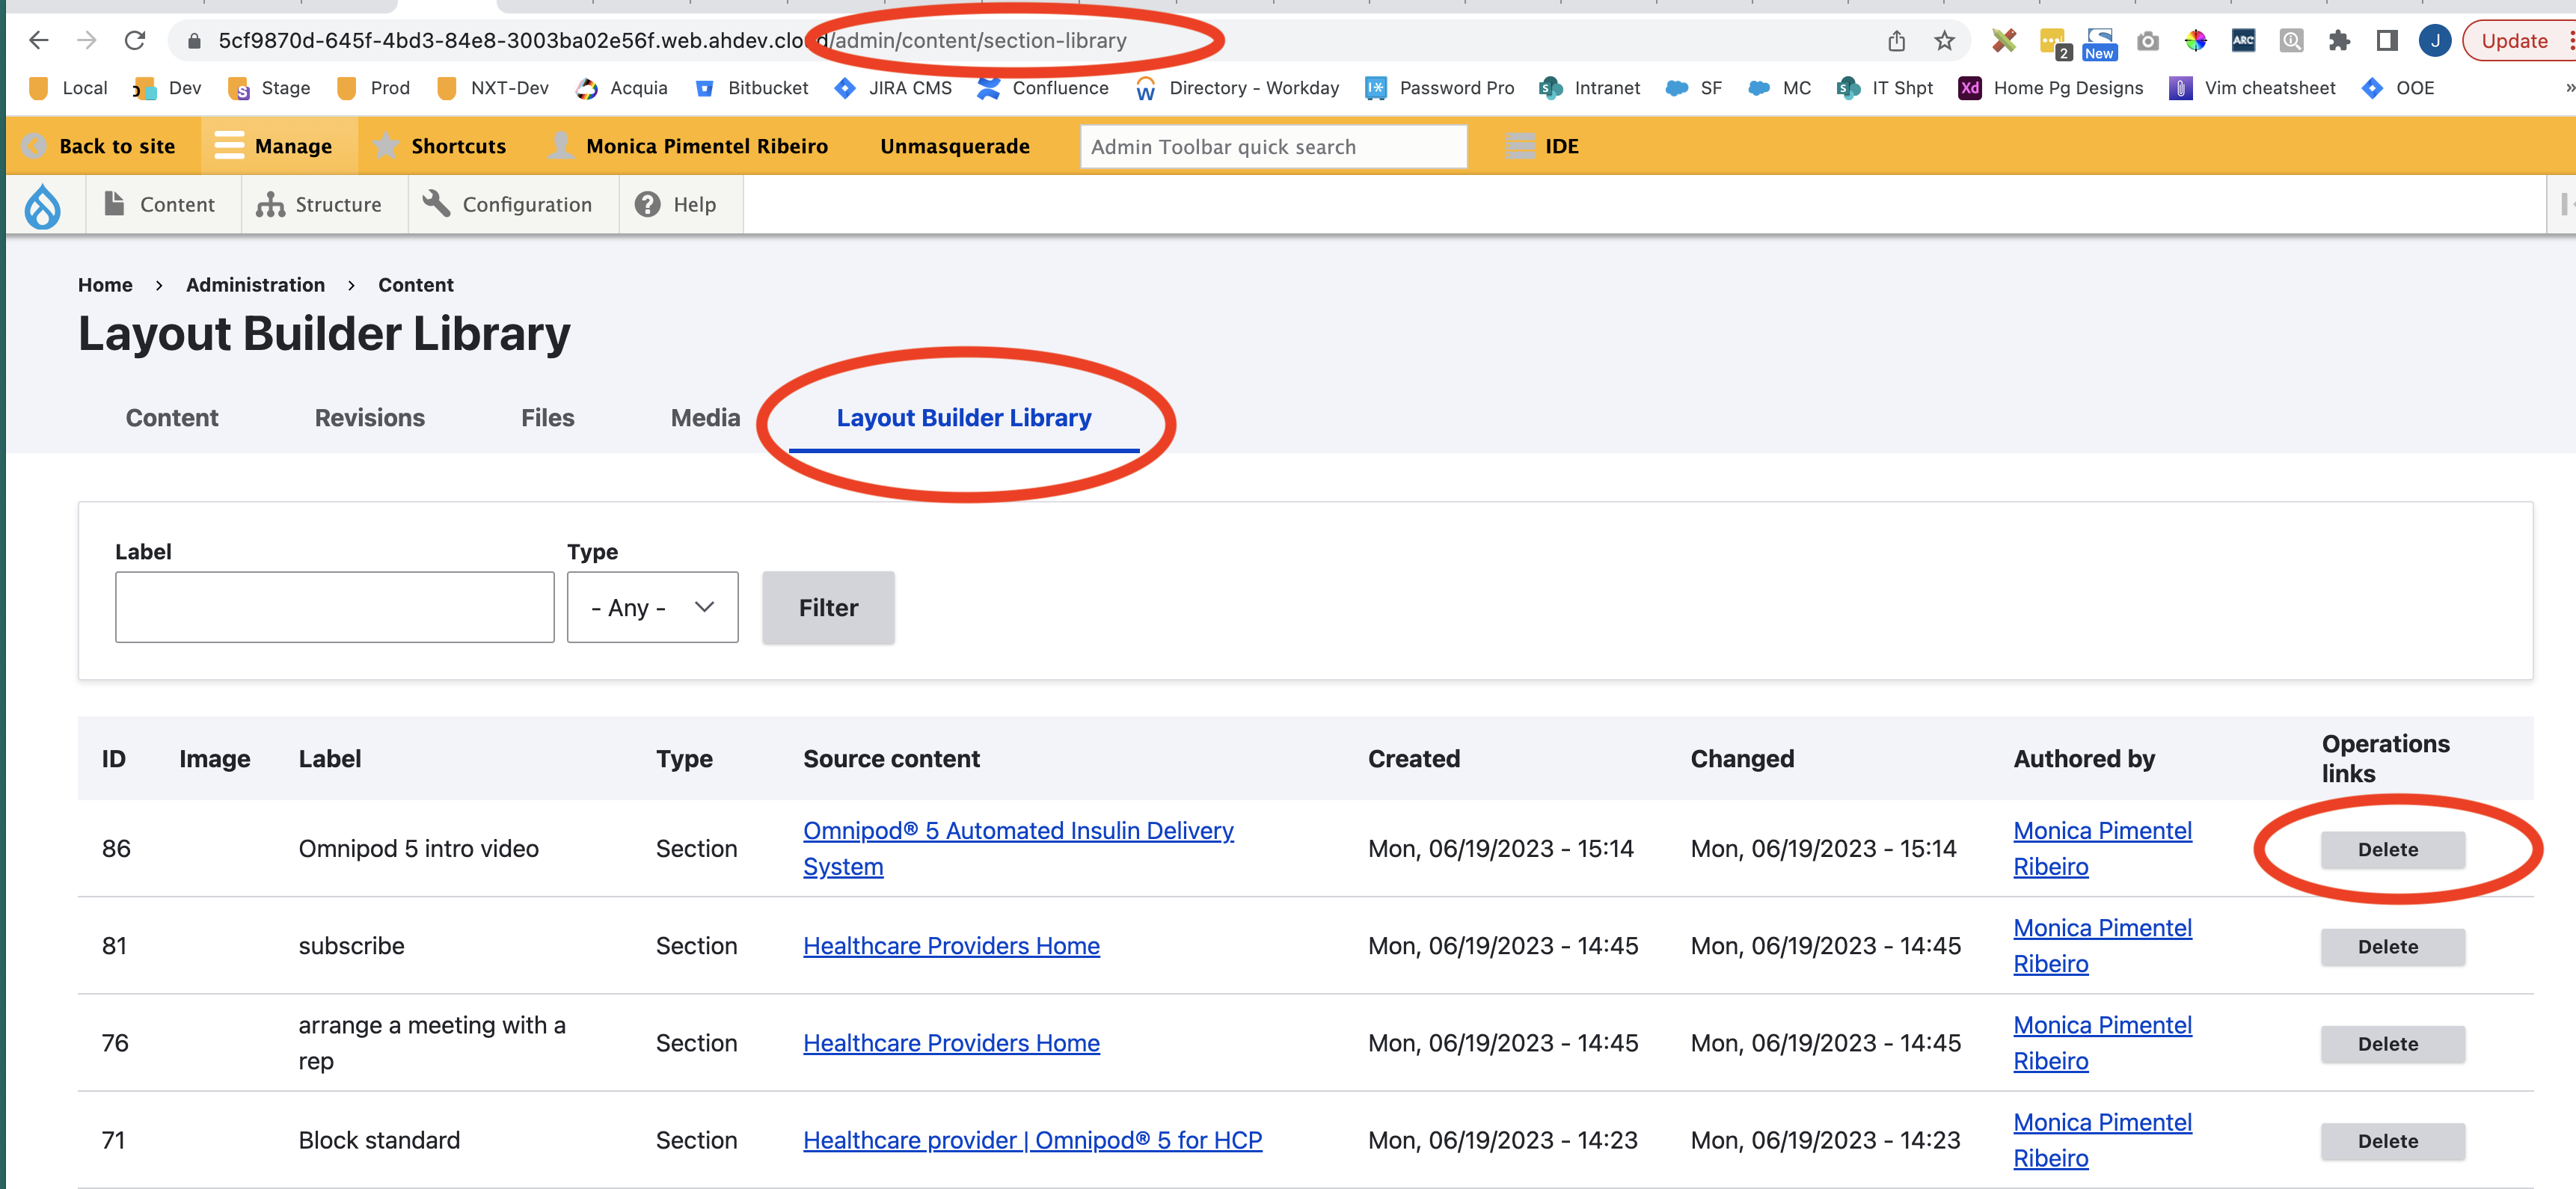
Deleting Section Templates from Section Library
Content Editors:
Best practice is to delete sections from the Section Library after you are finished with using the Section Library to copy them. This is so we don't clutter up the Library. You now have permission to delete those sections.
To do this:
- Navigate to /admin/content/section-library. You can do this by clicking on "Content", then on the "Layout Builder Library" tab.
- Find the Section that you are finished with.
- Use the delete button on the right to delete that specific Section from the Section Library. Note that this does not delete the Section from any page it is on; it only deletes it from the Library.
Working with Documents
General Info
Documents are a special type of Media. In addition containing an uploaded PDF file, a Document can have:
- a Name
- optional Media Keywords to describe it (taxonomy)
- an optional Language that indicates the language of the PDF (taxonomy)
- a Product and Version that indicates the Product associated with the PDF (taxonomy) (for example, "Omnipod 5" or "Omnipod GO")
To see and filter the list of available Documents, go to Content > Media > Document List.
To get a link to a Document that will not change, even if the PDF name changes or a new PDF is uploaded within a Document, use the text in the 'shortcode' link column of the Document List. (Do not click on that link and use what comes up in the browser... that is the place where the actual file lives.) For example, https://omnipod.com/document/441 will always redirect to the PDF contained in that Document media entity.
Best Practices
- You can now edit the name of the Document so it does not need to be the same as the PDF stored inside it. Use a readable name without dashes and underlines!
- Always use the Document's 'shortcode' link when adding a link to it in content.
- Use Media Keywords field to describe the PDF inside the document. For example: "user guide" "technical guide" "troubleshooting".
- Organize your Documents by using the Product and Version field and Language field, when appropriate.
Specific How-tos for working with documents
How insert a link to a document in CKEditor
CKEditor is the name of the editor which is available to the Content Editor in Text/CTA blocks (and some other places, as well).
There are two ways to add a link to a Document's PDF using the 'shortcode' link. The advantage of using the 'shortcode' link of the Document is that even if the PDF inside the Document is replaced or renamed, the 'shortcode' link will not break and will always go to the most recent PDF.
Method #1: Use "Insert Media" button
- Using CKEditor, click on the "Insert Media" button.
- Click on "Documents" in the Media Library
- Use the filters available to find the Document for which you want to add a link.
- Click Insert Selected.
- The Document link should now be available, using the name of the Document as the link text. If you update the name of the Document itself, the link text will automatically update.
- If the Document has a Language, you can update it to use the "Language Link" view mode instead of the "Default" view mode. The Document link is now available using the Document's Language as the link text. (If the Document does not have a Language specified, then the name of the Document will continue to be used as the link text.) If you update the Language field of the Document, the link text will automatically update.
Method #2: Create a Link Manually
- Go to /admin/content/doc-list
- Use the filters to find the Document for which you want to create a link
- Copy the text of the 'shortcode' link. It will be /document/nnn, where nnn is a number
- Using CKEditor, type in the text for your link.
- Select that text, click the link button, and provide the shortcode link as the URL.
The advantage of this method is that you can use any text to represent the link; you are not limited to the Document's name or Language.
Redirects
Vanity URL Redirect
Steps to add a vanity URL redirect:
- Hover over "Configuration" under the "Manage" nav tab
- Hover over "Search and metadata"
- Hover over "URL redirects"
- Click on "Add redirect"
- In the "Path" text box, add (without the first /) the URL you'd like like to redirect from
- In the "To" text box, include the URL you'd like to redirect to (make sure to include the first /)
- Click the blue "Save" button
To view or edit an existing URL redirect:
- Hover over "Configuration" under the "Manage" nav tab
- Hover over "Search and metadata"
- Click on "URL redirects"
- Using the "From" and/or "To" search boxes, search for the URL redirect of choice
- Once found, click the "Edit" button to the right of the redirect
- Save changes once done
Non-US Vanity URL's
US to Non-US Method:
If you need to do a non-US vanity URL (such as omnipod.com/tv) to a page whose original language translation is US (example: UK needs /tv to go to /en-gb/tubeless-summer but that page's original language translation is US), then a double redirect needs to be set up. Otherwise the vanity URL will always go to the original language translation of the page.
/dashintro vanity URL > /en-gb/is-omnipod-right-for-me URL:
- Path = dashintro
- To = /en-gb/dash-intro -- (node 2216 - new unpublished blank campaign page that only has a UK translation)
- 301
- All languages
- Path = node/2216
- To = /en-gb/is-omnipod-right-for-me
- 301
- All languages
Non-US to Non-US Method:
Create the redirect as you normally would, but keeping in mind of a few things:
- Make sure to change the "Language" dropdown selection to what's needed.
- In the "Path" (from) field, exclude the language and country part of the URL.
- In the "To" field, include the language and country part of the URL.
Example:
From: type1optimist
To: /en-ca/pod-promise-program?ctoken= 701Ht000001lyFMIAY&utm_source=type1optimist&utm_medium=partnership&utm_campaign=podpromise
Language: Canada-English
Between 2 Live Pages
To do a redirect between 2 live pages:
- Unpublish the old page(s).
- Add "/old/ to the end of the URL(s) of the old page(s).
- Add URL redirect as normal using the URL aliases (Path, To, and Language - if applicable).
- Save.
Note: a possible situation that may call for this is when we're cloning a page and need to replace it with the newer one (keeping the same URL, so we don't break anything linking to it).