Pod Placement Guide
Follow these steps to help you comfortably wear your Pod.
Pod placement with a Sensor (if using Omnipod® 5)
Your Pod and Sensor communicate best if they are worn in a way that the two devices can “see” one another without your body blocking their communication.
Every body is different. You should find the placements that work best for you.*
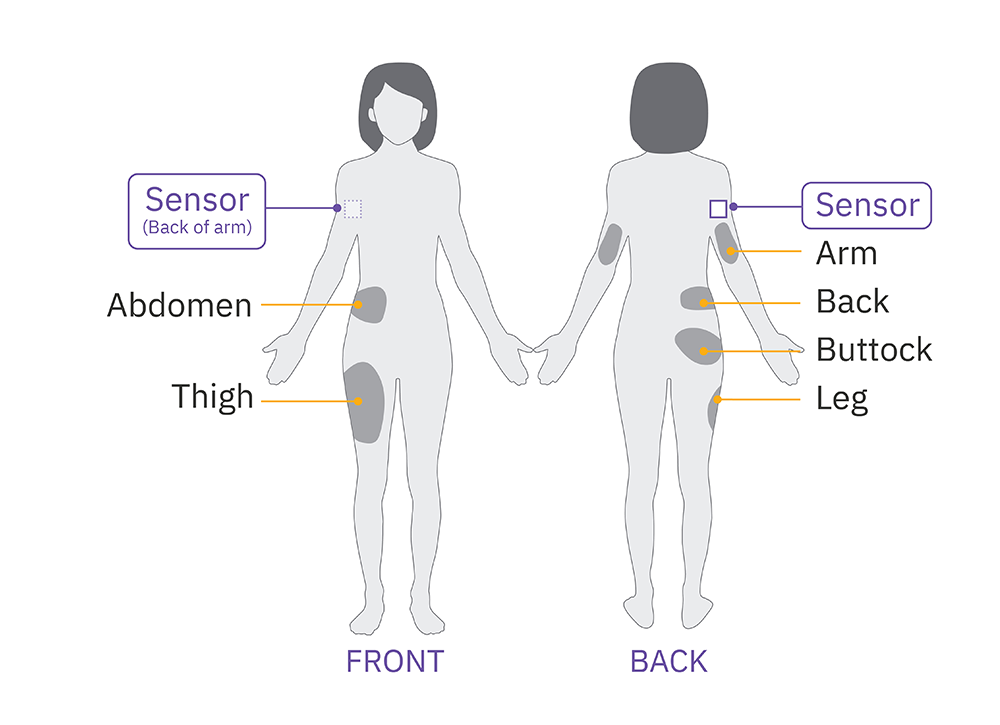
Adult placement examples†
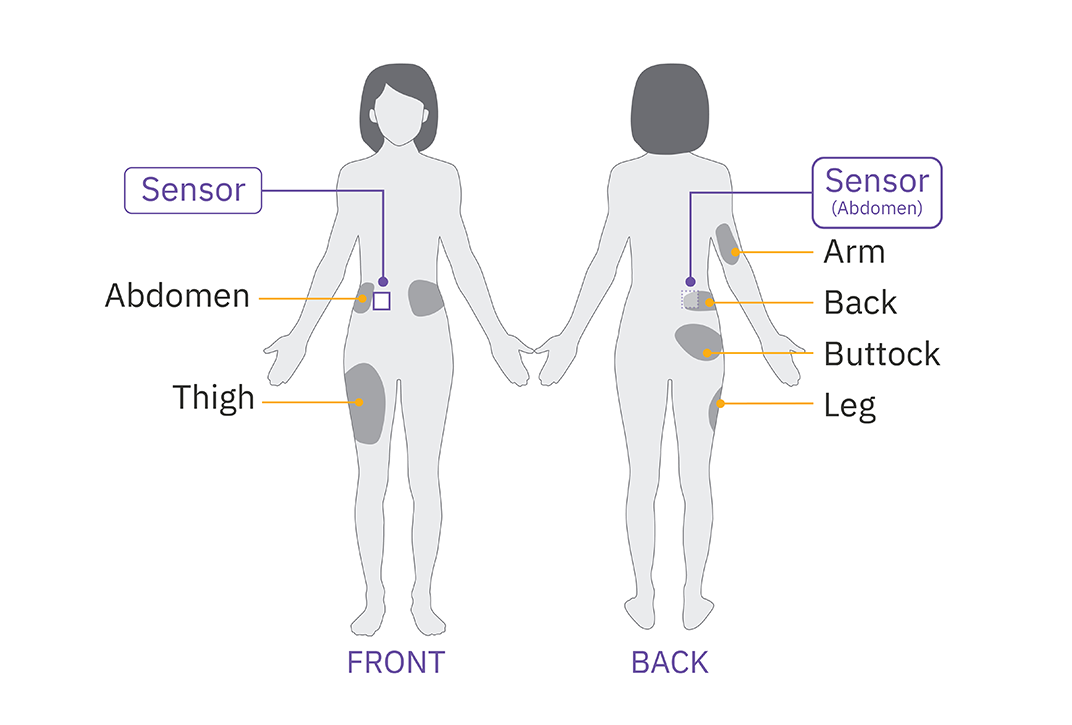
Adult placement examples†
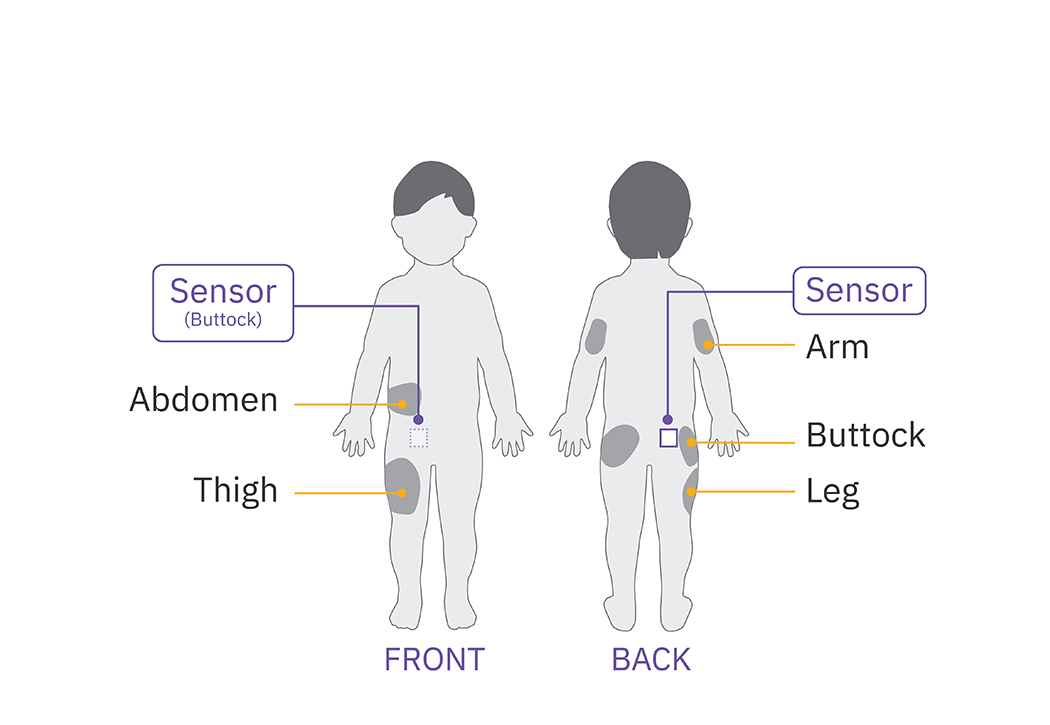
Pediatric placement examples†
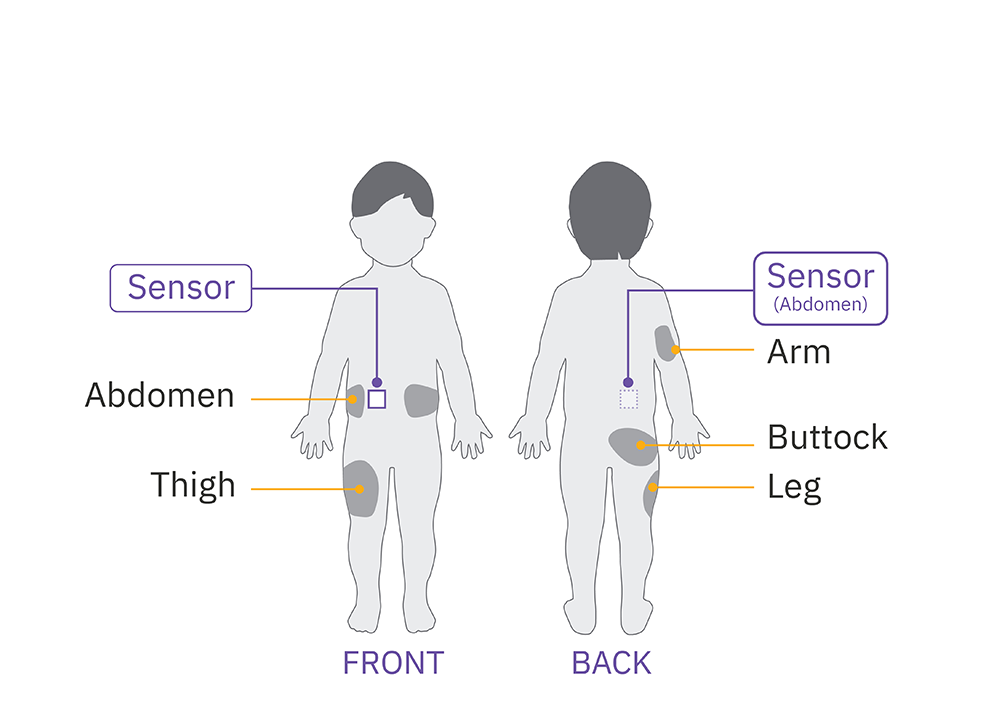
Pediatric placement examples†
For Sensors worn on back of upper arm, place your Pod:
- On the same arm as Sensor†
- Abdomen, same side
- Side of abdomen, same side as Sensor
- Lower back, same side (adult only)
- Thigh, same side
- Upper buttocks, same side
- Back of the opposite arm
For Sensors worn on abdomen, place your Pod:
- Abdomen, same side
- Abdomen, opposite side
- Side of abdomen, same side as Sensor†
- Lower back, same side (adult only)
- Thigh, front sides or outer same side
- Back of arm, same side
- Upper buttocks, same side
†Pod and Sensor should be placed at least 1 to 3 inches apart, depending on Sensor used. See your Omnipod 5 User Guide for approved sensor placement and separation distances
Considerations for Pod placement1
- Avoid irritated or swollen skin, open wounds, scabs, or cuts.
- Rotate sites for best insulin absorption. Do not overuse sites.
- Place the Pod so it lays flat, not on a curved area of the body.
- Avoid placing the Pod in sites where it may be uncomfortable or dislodge easily, such as near folds of skin or directly under your waistband.
Prepare the Skin First
Use an alcohol swab or an oil-free antibacterial soap to clean a spot the size of a tennis ball where you will place the Pod. Let the site air dry completely before applying the Pod.
Shave or trim any excess body hair before applying the Pod.
Always ensure the skin is completely dry before you apply the Pod. Especially after swimming or bathing.*
| CONCERNS | WHAT YOU CAN DO |
|---|---|
| Oily skin: Residue from soap, lotion, shampoo or conditioner can prevent your Pod from sticking properly. | Clean your site thoroughly with alcohol before applying your Pod – and be sure to let your skin air dry. |
| Damp skin: Dampness gets in the way of adhesion. | Towel off and allow your site to air dry thoroughly; do not blow on it. |
| Body hair: Body hair literally gets in-between your skin and your Pod – and if there is a lot of it, can keep the Pod from sticking securely. | Clip/shave the site to create a smooth surface for Pod adhesion. To prevent irritation, consider doing this 24 hrs before putting on the Pod. |
| Sweating: Sweat on the skin can prevent the Pod from sticking securely. | Apply unscented solid or spray antiperspirant in the insertion area. Wait 10-15 minutes before applying the Pod. |
Pod Positioning:
- Arm and Leg: Position the Pod vertically or at a slight angle.

- Back, Abdomen and Buttocks: Position the Pod horizontally or at a slight angle.

Pinching Up
This step is critical if the insertion site is very lean or does not have much fatty tissue.
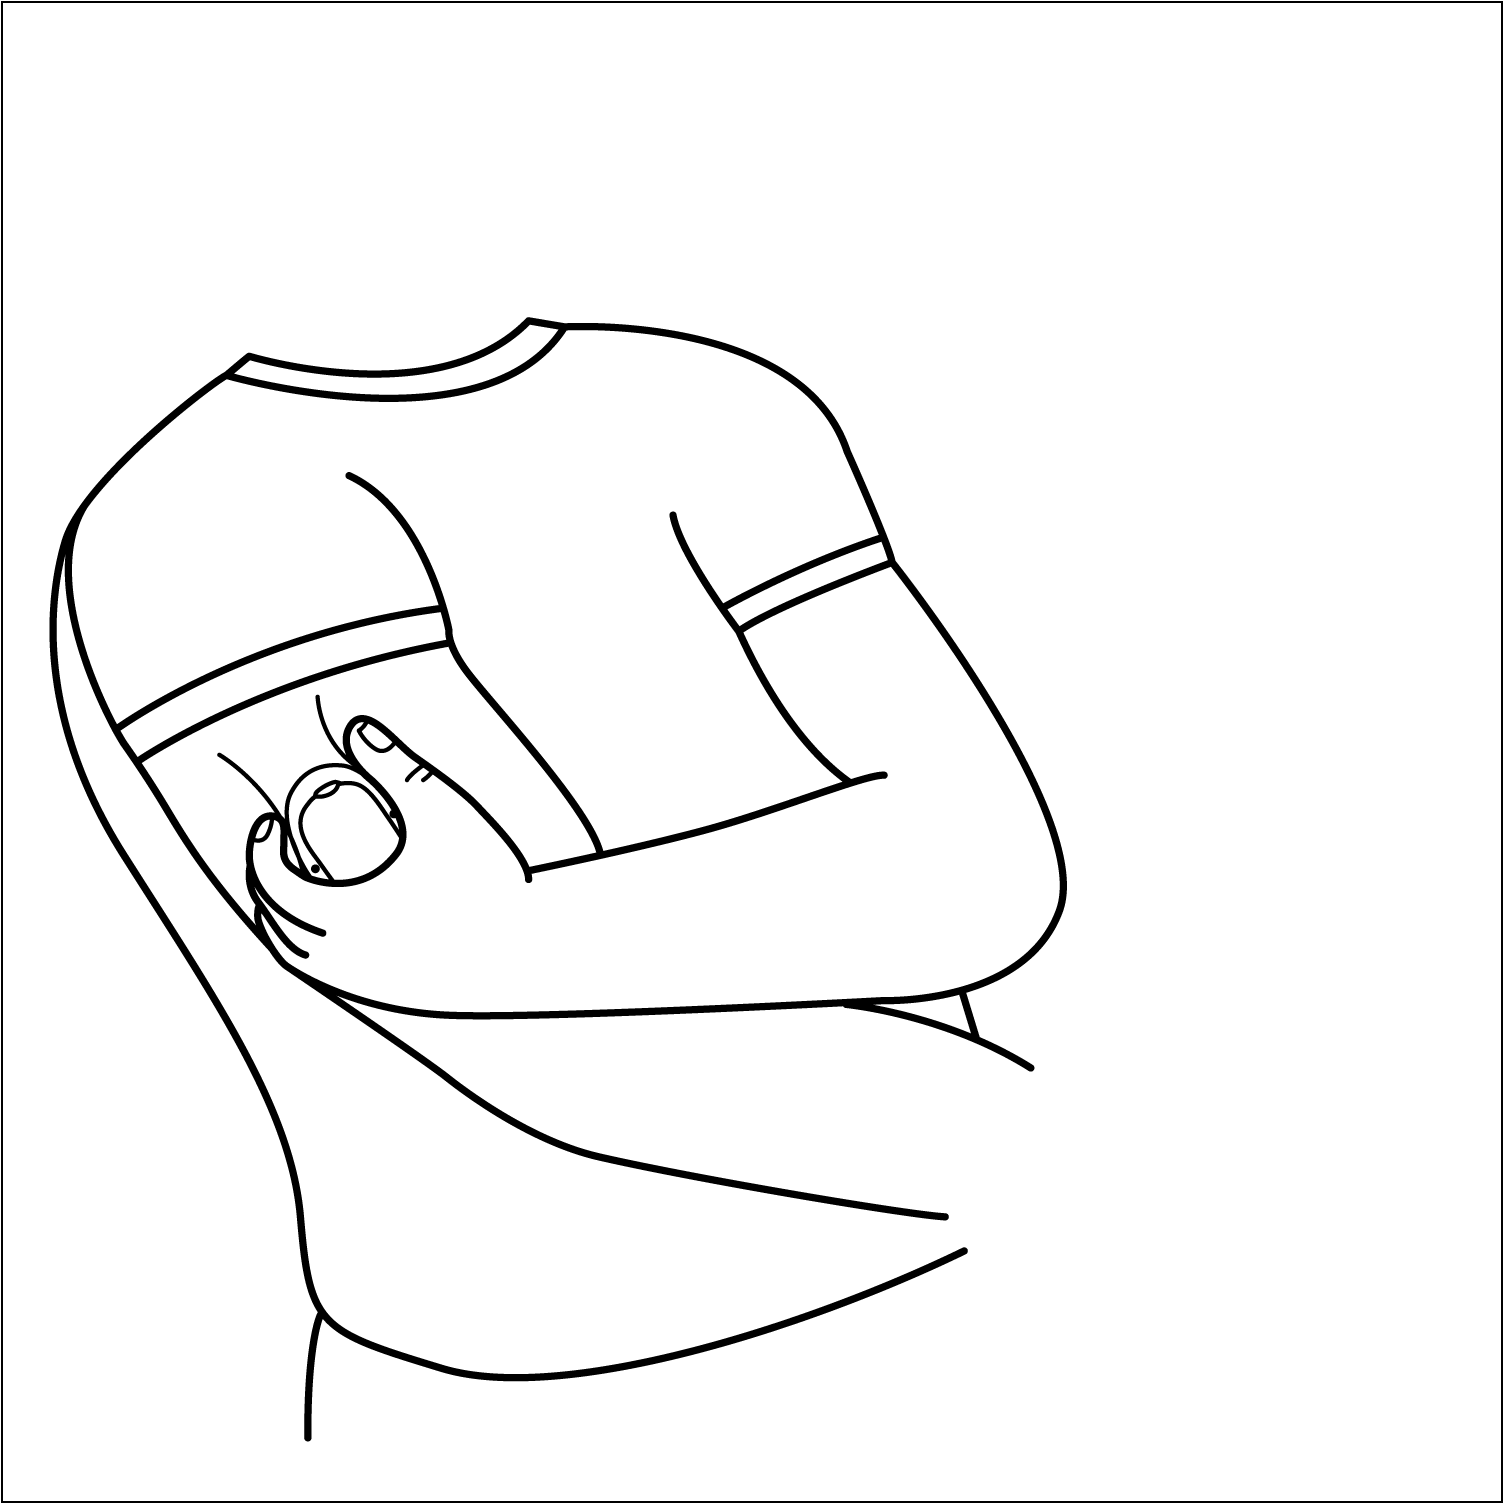
- Place your fingers on each side of the viewing window and make a wide pinch around that skin. Do not pinch too hard. The Pod should not come off the skin. Then press the Start button on the Controller/PDM. Release the pinch when the cannula inserts.
Warning: Occlusions may result in lean areas if you do not use this technique.
Applying the Pod
- Place the Pod on the skin being careful to avoid wrinkling the adhesive pad.
- Push the Pod down firmly using the palm of your hand to secure the entire area of the adhesive to the skin.
- Run your finger around the adhesive 2-3 times to ensure that it is fully secured to the skin.
Considerations for Daily Pod Use
- Avoid using spray sunscreen, body oils, lotions, personal care sprays or bug sprays on or near the Pod. They can loosen the Pod’s adhesive, and can irritate the infusion site, damage or crack the Pod’s plastic, which could result in water getting into the Pod, causing the Pod to not work properly.
- Check your Pod adhesive regularly, especially when swimming.
*The Pod has an IP28 rating for up to 7.6 m or 25 feet for 60 minutes. The PDM/Controller are not waterproof.
1. Messer LH, et al. Preserving Skin Integrity with Chronic Device Use in Diabetes. Diabetes Technol Ther. 2018;20(S2):S254-S264. doi:10.1089/dia.2018.0080.
To learn more about Pod adhesion, visit Pod Wear Tips.